Introduction
The Himalaya represent an unparalleled natural laboratory for examining processes active in large continent-continent collisional zones. The massive topographic relief and rock exposure along orogen-perpendicular river valleys form vertical structural cross-sections through the mountain range. These transects expose a variety of lithoteconic units including foreland basins deposits, deformed supracrustal sedimentary rocks, the now exhumed high-grade mid-crustal infrastructure of the orogen, and overlying, detached and deformed sedimentary cover. With the exception of the lower crust, by following a transect across the Himalaya one has the opportunity to walk through and examine a wide range of rock types involved in mountain building process at almost any structural level.
This virtual field guide traverses the upper Tama Kosi and Rolwaling valley region of east-central Nepal (Figure 1), a region underlain by the exhumed, mid-crustal metamorphic core of the orogen. The transect along the Tama Kosi and Rolwaling river valleys crosses the well-documented Himalayan inverted metamorphic sequence which contains and a structure in the metamorphic package that is expressed as a structural, chronologic, and metamorphic discontinuity (Larson et al., 2013). Potentially similar discontinuities have recently been reported from various structural positions across the Himalaya (e.g. far east Nepal - Goscombe et al., 2006; central Nepal – Larson et al., 2010; west central Nepal – Carosi et al. 2010 and Montomoli et al., 2013; far west Nepal – Yakymchuck and Godin, 2012). Those that occur at a structural level similar to the one in the Tama Kosi region may mark the transition between deformation recorded in the deep hinterland and deformation recorded in the shallower foreland of the evolving orogen (e.g. Larson et al., 2010). This transect provides an opportunity to examine how convergence was accommodated at midcrustal structural levels as the Nepalese Himalaya evolved.
Figure 1. Physiographic map of the Tama Kosi/Rolwaling region
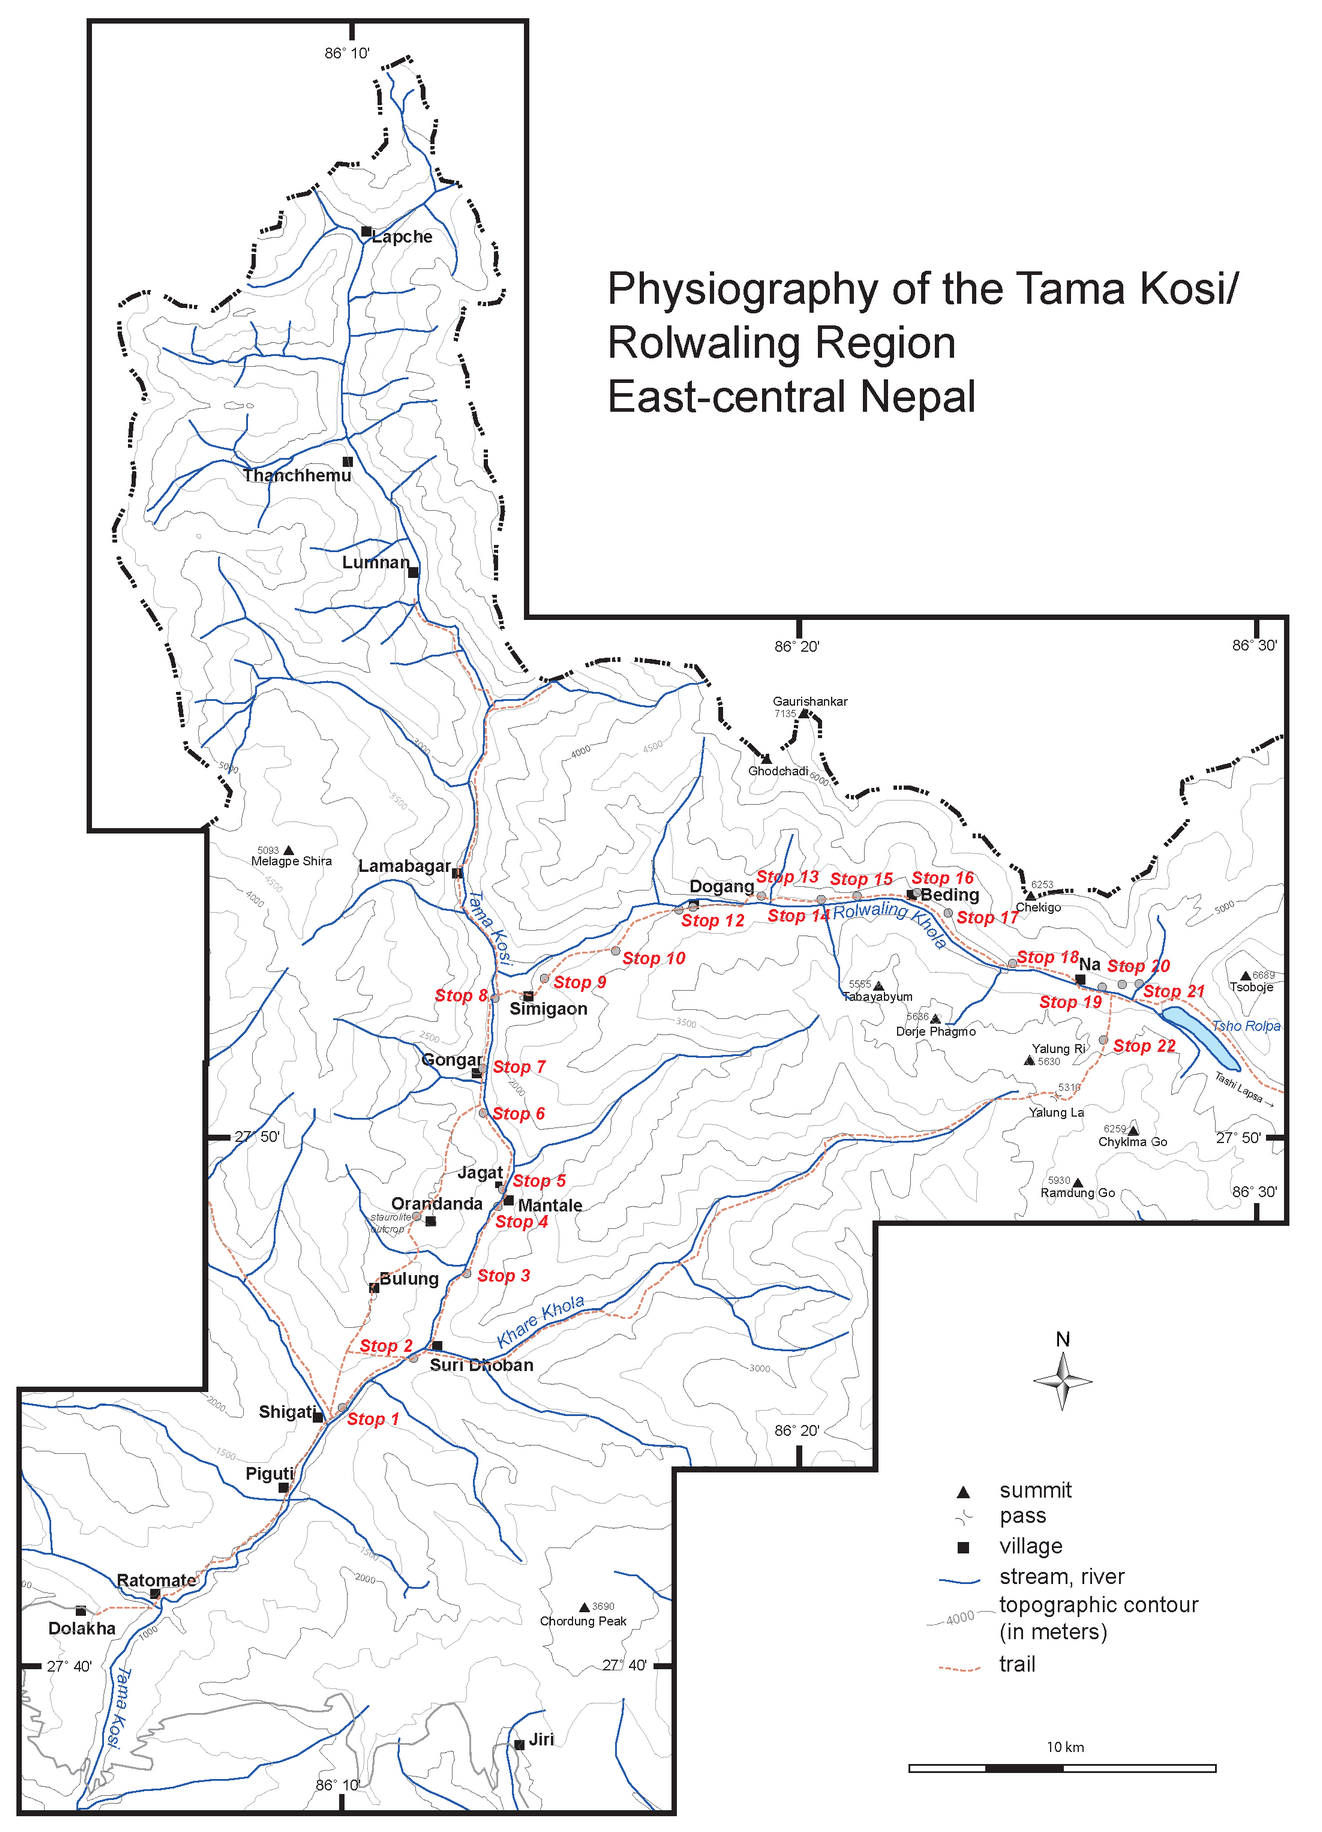
General physiographic map of the Tama Kosi/Rolwaling region. Stop locations mentioned in the text are noted. The location of this map / field trip area is shown in Figure 2.
Accessing the Area
Be sure to arrange all appropriate permits and logistical support in Kathmandu prior to leaving for the Rolwaling area; services are limited in the area.
Fieldwork presented in this guide was carried out in spring of 2009 and 2010. At that time the ‘end of the road’ was the town of Shigati (Figure 1). While access into the region may have changed (see below) it is recommended to begin the trip as indicated in the itinerary below to maximize examination of different rock types at various structural levels.
At the time of publication, the region is the site of a massive hydropower construction project run by Upper Tamakoshi Hydropower Limited. More information on this project is available on the company’s online site (http://utkhpl.org.np/). As progress on the project continues, road access, trail routes and rock exposures are subject to change. So too are potential access routes and available transportation. As a result it is possible that one or more of the outcrops presented herein along the Tama Kosi river may no longer be accessible/exposed. In such a case it would be likely that new exposure has been created, which can be examined in the context of the accompanying descriptions, and may even provide new insights. Once within the Rolwaling valley all stops and outcrops are likely to have remained unchanged.
The upper Tama Kosi and Rolwaling region can be accessed through the town of Dolakha, a ~ 4-5 hour private bus ride to the east of Kathmandu (public bus transportation would take significantly longer). At Dolakha there is an option to spend the night and then trek to the town of Shigati the next day, or take a ~2 hour bus ride from Dolakha to Shigati provided transportation (bus, jeep, tractor) can be arranged (same day is possible). For the return trip, Dolakha is the preferred exit point for the trek as it is a major hub with easy access to multiple daily buses to Kathmandu.
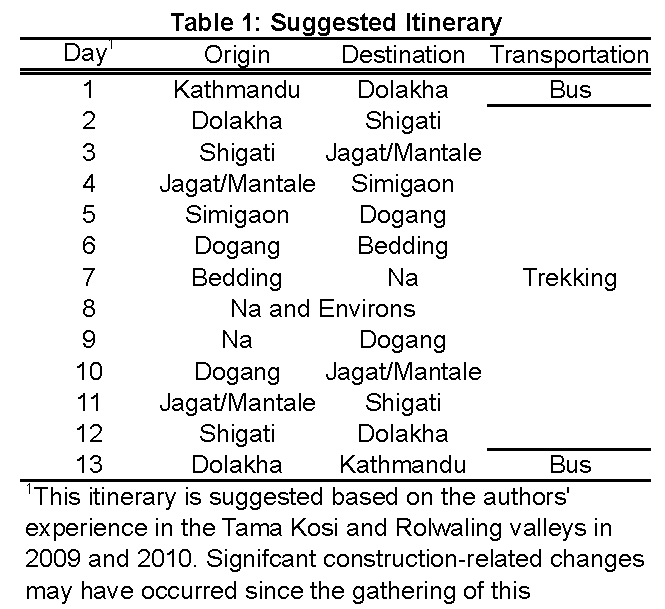
Suggested Itinerary
The trip can be completed in twelve to thirteen days. However, there are ample opportunities for side ventures along the way that can extend the time spent in the field (some will be noted below along with the potential geologic observations as appropriate). The basic itinerary is outlined in Table 1. Lodging is available in all villages indicated as ‘destinations’; however, it is advisable to be prepared to camp for a night or two depending on local vacancy as in some villages there is only one guesthouse. The farthest destination in this field guide is the village of Na in the upper Rolwaling valley (Figure 1). Na serves as a seasonal home for many of the families that typically reside in Bedding (Figure 1). It is recommended that arrangements for accommodation in Na (if desired) be made while in Bedding as, depending on the time of year, there not be anyone in Na to provide a place to stay.
The village of Na sits at an elevation of ~ 4200 m, thus participants should be prepared for possible altitude sickness. The itinerary in Table 1 typically ascends at a pace that should minimize potential symptoms of altitude sickness. It is, however, recommended that the trekker be aware of the symptoms of altitude-related problems and be prepared to descend to immediately to alleviate them. Moreover, as with any trek in the Himalaya, the participants should have a basic level of fitness that will allow them to walk for extended periods (5-8 hours) for 10+ consecutive days.